
 Hello! During this busy time of year I love projects that are quick and easy, but rewarding. Today, I'm going to share with you a super quick and easy, but really cute ornament. (cheap, too!) I have to warn you, these ornaments are addictive!
So, let's gather up our supplies:
 You're going to need some snow flake ornaments found just about anywhere. I purchased mine at Target last year when they went on clearance, but I'm quite certain I saw them there this year as well. The larger packs are 2 for $1, and the smaller ornaments are 4 for $1. Yep, cheap.
You will also need some lace scraps, Stickles glitter glue, (I used and adore Platinum), a little bit of tinsel, and some vanilla posies.
 You'll also need some strong adhesive, (I used The Ultimate glue which is my number one go to glue for anything that really needs to stick.) scissors, and Glimmer Mist. I used a little Tattered Rose, and Creme de Cocoa for this project. Old Lace, Vintage Pink, or Tea Rose would also be great color choices.
That's all you need. We're ready to get started now.
 First, spritz your snowflakes with the Glimmer Mists. You can see here how the Creme de Cocoa gives the bright white snowflake a subtle "aged" feel. The pink can be used as lightly as you would like. Some of mine ended up a little more pink than I wanted, but it's ok, we cover up quite a bit of the snowflake. Set those aside to dry.
Here are two images you might like to use.

 Both of these images are from my stash, but some of the other ornaments I will show you use images I purchased here. There are also other wonderful sellers on etsy that have beautiful images and plenty of free images on the internet.
You can click on these images to make them larger, then right click and save to your computer. Open them up in some sort of editing program and crop them into circles. For the smaller ornaments I cropped my images to 2", and for the larger ornaments I used 3" circles. I printed some of my images on cardstock, and some on fabric. The fabric just gives a softer image and texture.
 Use your circles as templates and also cut yourself some circles of vintage sheet music.
  Glue your image to the front of the snowflake. If you're not using The Ultimate glue, you will need to use some sort of strong adhesive as the glitter makes the image difficult to stick.
 Glue your sheet music circle to the back. (you can really use any kind of paper here, even more cardstock) This is simply to cover any of your work from the front and to give the back a nice finished look. You can also sign and date your ornaments here.
 Add a little scrap of lace.
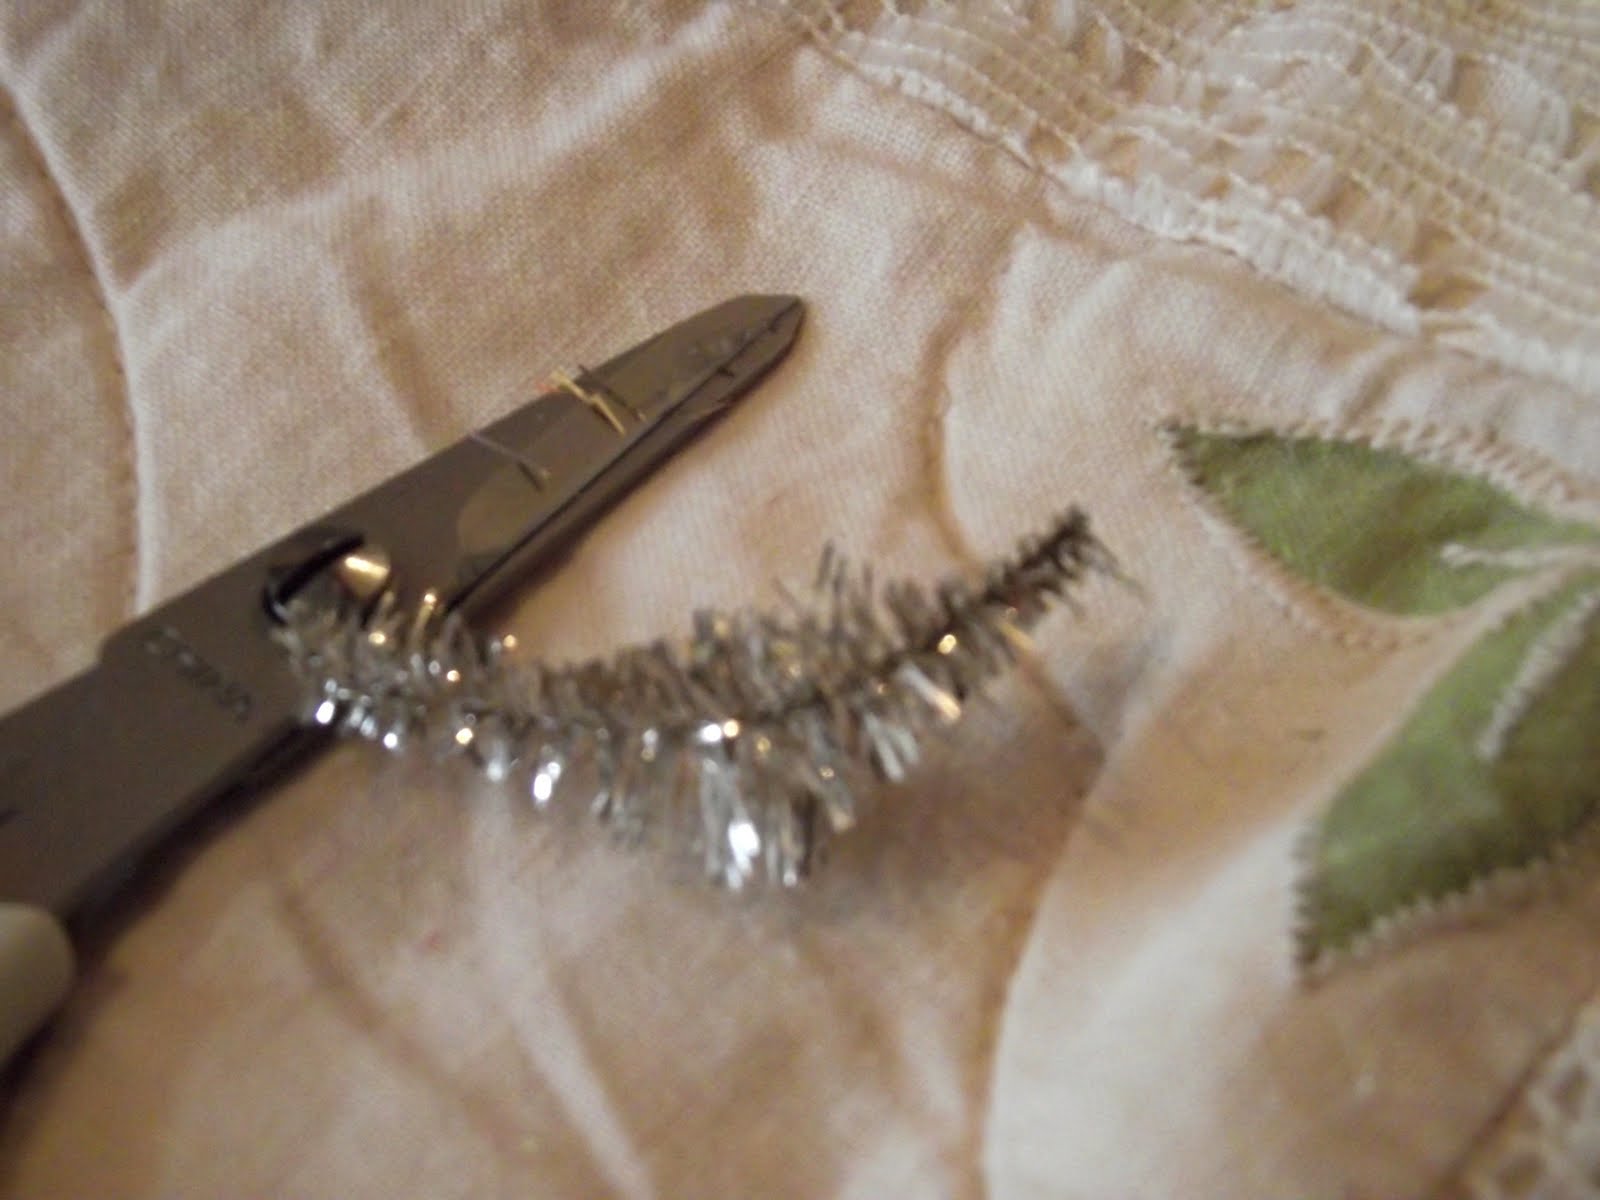 Cut and trim a little piece of tinsel. Glue it in place on top of your lace.
 Glue on a little paper posie that has been lightly spritzed with a touch of Creme de Cocoa and Tattered Rose Glimmer Mist. This ages the posies beautifully.
 Then, outline your image with the Stickles. When the Platinum Stickles dries, it looks just like tarnished silver. I love it. I also added a little dot of Stickles to the center of my flower. That's it! I told you that was easy!
Now, you can add a length of ribbon, or lace to the top of your ornament and hang on your tree. You could leave the ribbon off and use these as gift toppers. Hang a bunch of them in the varrying sizes from your chandeliers or ceiling for a Christmas party. Lots of things you can do with them!
Here are a few variations.
 I used fabric paper on these.
 I also used fabric paper on this one, and I added a vintage crocheted trim all the way around. Then I very lightly added the Platinum Stickles.
 For this larger ornament, I printed my image on cardstock, and cut random bits from my vintage lace stash. I then just glued those around my image, layering until I was happy with the look. I topped the lace w/ Stickles, making sure the rough edges of my lace was showing. I added 3 posies to this one as it's quite a bit larger.
That is it!
I really hope you enjoy this little project. If you have any questions, please let me know, I'll be happy to help. I would of course love to see any ornaments you might make.
Cerri xoxo


.jpg)


51 comments:
Cerri these are just DARLING!!! What a great idea! (For some reason no one can figure out I still can't leave messages on typepad.) Thanks for sharing such lovelies! Hope you and yours are well!
These are stunning! You make it look so easy, I can't wait to make a few!
I love these ornaments! Wonderful for a victorian tree! I have the perfect Christmas song on my blog.
Just love these ornaments! No Target here but I'll try the dollar store for similar snowflake ornaments.
I would never in a million years have thought of using Glimmer Mist to color one of those snowflakes! Brilliant idea! Thanks for sharing!
How adorable!!!!!
Hugs,
Robin
These ornaments are so sweet Cerri.
xo
jeanne
So very lovely!
These are adorable!!!!!!!! Thank you....adding to my list!
Thank you for the tute! Very pretty!
Blessings,
Sonya
OMG, seriously brilliant!
So cute!! I LOVE it!!
Cerri, you're right! Simple but beautiful! Thank you!
Diane
These are soooo adorable!
these are really sweet! LOVE them!
Yummy, sugary cutness!
Brandy
I love them!!! They are so cute. And love the idea about the glimmer mist! I am going to have to "age" some of my snowflakes!
Oh my goodness! I love these! I cant wait to make some!
Amazing.
With this kind of creativity I best become a follower!!!!!
Cerri, These are the most beautiful Christmas ornaments I've ever seen!
They make me want to redo my whole tree!
Cute ornaments! Thanks for sharing your idea!
Ann
Lovely! You turned them out so beautiful.
Buy WoW Accounts
Inspired by your tutorial, I decided to give this a try. Here is the link to my blog post about it A Robin's Nest.
Hugs,
Robin
Love these
thanks for showing us how
blessings
barbara jean
Thanks so much for sharing your lovely snowflake ornaments and for the lovely pictures of the little girls. I have a boxfull of those snowflakes from years ago when I added polymer clay snowman faces to the snowflakes. Elaine Akers
These are so beautiful! Thank you so much for sharing them and for the wonderful pictorial tutorial!
Thankyou, for this beautifull tutorial, I love your snow flakes,
XO, Dorthe
What a wonderful blog! After my visit last night, I decided to try making the snowflake ornaments. I didn't have all the items needed, so I just used what I had on hand on my craft desk. I have photos of my ornaments on my blog. Thanks for sharing. Elaine
Fantastic! Love these and hope to make a few. Appreciate the info. xx
Happy Holidays Cerri! These are gorgeous. I love seeing what wonderful creations can be made on the cheap. You'd never guess in a million years that it wasn't a high dollar creation.
Just beautiful. Thanks so much for taking the time to do this clear and easy step by step tutorial.
Merry Christmas and warm Hugs...Tracy :)
I have never seen such lovely ornaments. So kind of you to share the technique with us. Thank you. Sue x
Beautiful, I have to get out and find some snowflakes now :)
oooohhhh i adore these! wonder if i can get snowflakes like this in england?
Your ornaments are so beautiful! Thank you for sharing how to make them!
These are so dang cute!! Thanks for the tut. Merry Christmas!
robin
Thank You for the Wonderful Tutorial!
Simply but Adorable!
Have a Wonderful Week!
Hugs
Jill
This is an informative thing which you mentioned in your article. but i think the background colour of your blog must be different.
Plastic Gift Cards
Gift Card Printing
Came from Pinterest..and thank you for your wonderful tutorial on how you accomplished your end result. It is a treasure. I do have a question, how do you Print on Fabric? I have a HP deskjet printer.
Hello
Informative writing, Essays like this are so important to broadening people's horizons, Everyone loves what you guys are up too
Thank you!
Hello
I loved this blog post, You are very talented & This website is really worth to be checking
Thank You
I truly love your website.. Very nice colors & theme. Did you build this site yourself? Please reply back as I'm wanting to create my own personal blog and would love to know where you got this from or exactly what the theme is called. Cheers!
I wanted to thank you for this excellent read!! I definitely loved every little bit of it. I have you bookmarked your site to check out the new stuff you post. I am writing on this topic, so I think it will help a lot. I leave my blog address below. Please visit once.!
바카라사이트비즈
CasinoMecca
I truly appreciate this post. I’ve been looking everywhere for this! 릴게임
Hi there! This article could not be written much better! 토토사이트
oncasino
تقدم شركة كلينر خدمات التنظيف في الرياض خدمات متنوعة وعالية الجودة.
ارخص شركة تنظيف بالرياض
تتميز شركة كلين الرياض في الرياض بتوفير خدمات شاملة
شركة تنظيف منازل بالرياض
شركة سبيد واي تبرز كواحدة من أبرز الخيارات المتاحة للعملاء الذين يبحثون عن خدمة نقل الاثاث
نقل عفش بالرياض 200 ريال
Thanks so much for this information.
Also read
اعمال تستحق الشكر تابع اعمال فحص شبكات المياه الحارة والباردة بالضغط للخزانات والسخانات في الحمام ضروري للحفاظ على أداء هذه الشبكات وضمان سلامتها .
يتطلب هذا الفحص القيام بمجموعة من الخطوات الدقيقة لضمان حصول الجميع على مياه نظيفة وآمنة. وعندما يتم إهمال هذا الفحص، يُمكن أن تتسبب التسريبات والمشاكل التقنية في أضرار جسيمة للمنازل .
لذا، فإن الالتزام بالفحص الدوري والصيانة يُعتبر استثماراً مهماً للحفاظ على المنازل وتحسين جودة الحياة
شركة كشف تسربات المياه بالاحساء
شركة كشف تسربات المياه بالجبيل
Post a Comment